By Phasedscar
The Basics
OK, many of you want to make your own sprites and icons for RPG Maker XP, and I want to show you the steps in how to accomplish this. Since there aren't any terribly great guides out there, I'm attempting to make my own. This will give you the basics you need in order to make you own sprite artwork.
I'm going to show you how to color, template, and image your sprites to make your very own creations!
Anyway, lets get started...
Color
Without a doubt the single most important aspect of making a sprite. Why? Well because without the right colors you're sprites will end up looking flat, and unimpressive, and hey, we all want a bout of "WOW!"
So lets get started.
For any sprite you want to have no more than 4 shades of a single color. This is mainly due to crowding of shades, which dulls out detail in many sprites you will be making with RMXP. More on that later.
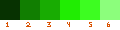
Wait a minute, why are there 6 colors? Didn't I just say 4? Numbers 1 and 6 are what are called super highlights. They add depth to each image, and are extremely important, but generally make up less than 10% of the image. Super highlights are used to augment the colors you're seeing to add more detail in cramped areas.

As you can see, super highlights are used to help seperate colors and shades in order to add more detail.
Now to pick your colors. Understanding how to pick colors is extremely important. So here's the
color wheel.
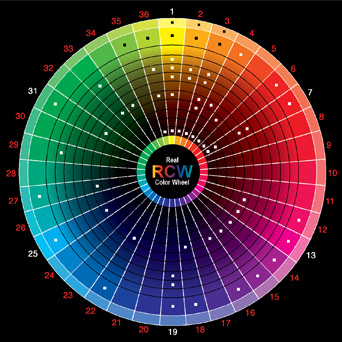
This is a little more complex then I'd like, but it best illustrates what I need you to know.
Complementary Colors, these are what is extremely important, and you need to know first. Colors opposite of eachother on the color wheel are called Complementaries, they make eachother "pop out" more.
My choice of using blonde hair was because of the heavy blue pants she is wearing. The red further augments and brightens the blues. I also have a slight bit of green in the image because some of tones are more violate than blue. These are all opposite of eachother on the color wheel, and so they complement.
Anyway, so sum this all up...
- Get 4 shades of one color, then have a super dark and super light version of it for the Super Highlights
- Pick colors that tend to complement eachother. You don't need to be terribly choosy in the process, but be in the ballbark
Making the Template
Ok, enough of that boring "picking the colors" junk, I know you want to get to the actual spriting.
Well, here's where you start.
First, and formost, know what size image you need. For icons in RMXP you are limited to 24x24 pixels, not a lot of choice there. However, for actor sprites you can have the ranges vary anywhere from 98x98 to 1024x1024. All you need to remember is that spriting actors requires a format that can be divided by 4, and that whatever number you choose, it will have a 4x4 grid of
tiles. This means that even if you choose a 1024x1024, each tile of the sprite will only be 256x256 pixels.
For this I'm going to use the 24x24 pixel limit that's reserved for icons, this is mainly just to making illustrating the point easier.
To make a template use basic colors you wont be using in your image. This is to keep from getting confused, and easily seperate the image out into what you want.

Now to apply the basic colors. I often find it's very helpful to lay out my colors and shades on the image. Eventually you'll want to delete them out, but at this stage it's more of a help then anything.
Anyway, now that I have colors chosen, and their shades, I applied the darkest shade to where I want it. This helps me keep track of where and what colors to use, plus it's almost always easier to see against a bright backround.

Now that we have a template ready, lets move on to shading!
To recap:
- Know your format. It's extremely important you're sure you have the right size for the job. Too large and it wont appear right in your game!
- Create a false image template just to get the basic shape you want. It's usually best to pick colors you wont be reusing anywhere in the image, however that's not really necessary. This is the stage where you form your image.
- Choose the colors you want to use, and apply at least one shade of it to each part of your template. This helps keep track of where you want your colors.
Shading
This is where the image will come to life, and all the details will show through. But there's a couple of things to consider before you start.
Lighting, always have a light source. Know which direction you want light to shine on your sprite. Sometimes it helps to place a pixel in your image, or even use a piece of scotch tape on your monitor. Anything to help you keep track of where your light source is. This will help you keep a consistent feel over your image.
In general for icons you either want the light source coming from the upper left corner, or from the front.

Now for some lighting!
The best idea is to use your high shade (not the super highlight) closest to your light source, and the dark shade (your super shadow, in this case) on the farthest side. This will make the basis for your shading, and will greatly increase the texture of your object.


Almost starting to look done, isn't it?
That's because we almost are!
Next step is called stipling, or rendering, the image. All that means is you make the shades fade into eachother a little more. Take your time on this phase, since it usually requires the most patience and will often make you use the ctrl+z a few times. That's OK, this is where time matters most!


Clean up the image, removing all the extras you don't need anymore, and that's it. Try that out in your game and see if you like it. If not just keep editing it and you see a result you like.
And the finished product will look like this.

(I however altered the image to fit in more with my icon workshop's 1 handed sword subsection)
Recap:
- Pick a light source.
- Start rendering your image, and if needed, change your template somewhat to get the effect you want.
- Double check your work, if you like what you see and feel satisfied, then you're done!
I hope that this guide helps everyone to making their own art. I plan to eventually release another tutorial in how to use Photoshop to further enchance your sprites.