Show posts

This section allows you to view all posts made by this member. Note that you can only see posts made in areas you currently have access to.

Topics - Seltzer Cole

1
Script Troubleshooting / RMXP Weapon States (Any advice?)
February 11, 2014, 10:12:07 pm
I am making an ABS first off. The battles take place on the actual map, not in a zoomed screen. I wanted to add status effects (States) to my weapons. After many attempts, I realized you cannot equip a weapon and it automatically inflict you outside of a battle. Even still, within a battle the affliction only works on enemies, not on a character.

I wrote a script (Probably the crappiest script anyone has ever seen) to fix my issue. It is as follows...

Spoiler: ShowHide
      $game_party.actors[0].remove_state(30)
      $game_party.actors[0].remove_state(31)
      $game_party.actors[0].remove_state(32)
      $game_party.actors[0].remove_state(33)
      # Below is for Spear
      if $game_party.actors[0].weapon_id == 1
      $game_party.actors[0].add_state(30)
    end
      if $game_party.actors[0].weapon_id == 2
      $game_party.actors[0].add_state(30)
    end
      if $game_party.actors[0].weapon_id == 3
      $game_party.actors[0].add_state(30)
    end
      if $game_party.actors[0].weapon_id == 4
      $game_party.actors[0].add_state(30)
    end
      if $game_party.actors[0].weapon_id == 5
      $game_party.actors[0].add_state(30)
    end
      if $game_party.actors[0].weapon_id == 6
      $game_party.actors[0].add_state(30)
    end
      if $game_party.actors[0].weapon_id == 7
      $game_party.actors[0].add_state(30)
    end
      if $game_party.actors[0].weapon_id == 8
      $game_party.actors[0].add_state(30)
    end
      if $game_party.actors[0].weapon_id == 9
      $game_party.actors[0].add_state(30)
    end
      # Below is for knife
      if $game_party.actors[0].weapon_id == 11
      $game_party.actors[0].add_state(31)
    end
      if $game_party.actors[0].weapon_id == 12
      $game_party.actors[0].add_state(31)
    end
      if $game_party.actors[0].weapon_id == 13
      $game_party.actors[0].add_state(31)
    end
      if $game_party.actors[0].weapon_id == 14
      $game_party.actors[0].add_state(31)
    end
      if $game_party.actors[0].weapon_id == 15
      $game_party.actors[0].add_state(31)
    end
      if $game_party.actors[0].weapon_id == 16
      $game_party.actors[0].add_state(31)
    end
      if $game_party.actors[0].weapon_id == 17
      $game_party.actors[0].add_state(31)
    end
      if $game_party.actors[0].weapon_id == 18
      $game_party.actors[0].add_state(31)
    end
      if $game_party.actors[0].weapon_id == 19
      $game_party.actors[0].add_state(31)
    end
      # Below is for club
      if $game_party.actors[0].weapon_id == 21
      $game_party.actors[0].add_state(32)
    end
      if $game_party.actors[0].weapon_id == 22
      $game_party.actors[0].add_state(32)
    end
      if $game_party.actors[0].weapon_id == 23
      $game_party.actors[0].add_state(32)
    end
      if $game_party.actors[0].weapon_id == 24
      $game_party.actors[0].add_state(32)
    end
      if $game_party.actors[0].weapon_id == 25
      $game_party.actors[0].add_state(32)
    end
      if $game_party.actors[0].weapon_id == 26
      $game_party.actors[0].add_state(32)
    end
      if $game_party.actors[0].weapon_id == 27
      $game_party.actors[0].add_state(32)
    end
      if $game_party.actors[0].weapon_id == 28
      $game_party.actors[0].add_state(32)
    end
      if $game_party.actors[0].weapon_id == 29
      $game_party.actors[0].add_state(32)
    end
      # Below is for Creator
      if $game_party.actors[0].weapon_id == 31
      $game_party.actors[0].add_state(33)
    end


A quick explanation... There are 3 weapon types. Spears, Knives and Clubs. There are nine of each type (Meaning 9 spears, 9 knives and 9 clubs). The one at the very end of the code called "Creator" is just something extra I threw in for testing purposes.

I tagged this code into Scene_Equip here...

Spoiler: ShowHide
   # If C button was pressed
    if Input.trigger?(Input::C)
      # Play equip SE
      $game_system.se_play($data_system.equip_se)
      # Get currently selected data on the item window
      item = @item_window.item
      # Change equipment
      @actor.equip(@right_window.index, item == nil ? 0 : item.id)
----------> HERE!!!!!!!!!!!!!! <----------
      # Activate right window
      @right_window.active = true
      @item_window.active = false
      @item_window.index = -1
      # Remake right window and item window contents
      @right_window.refresh
      @item_window.refresh
      return
    end
  end
end


The final product is as follows...

Spoiler: ShowHide
    # If C button was pressed
    if Input.trigger?(Input::C)
      # Play equip SE
      $game_system.se_play($data_system.equip_se)
      # Get currently selected data on the item window
      item = @item_window.item
      # Change equipment
      @actor.equip(@right_window.index, item == nil ? 0 : item.id)
      $game_party.actors[0].remove_state(30)
      $game_party.actors[0].remove_state(31)
      $game_party.actors[0].remove_state(32)
      $game_party.actors[0].remove_state(33)
      # Below is for Spear
      if $game_party.actors[0].weapon_id == 1
      $game_party.actors[0].add_state(30)
    end
      if $game_party.actors[0].weapon_id == 2
      $game_party.actors[0].add_state(30)
    end
      if $game_party.actors[0].weapon_id == 3
      $game_party.actors[0].add_state(30)
    end
      if $game_party.actors[0].weapon_id == 4
      $game_party.actors[0].add_state(30)
    end
      if $game_party.actors[0].weapon_id == 5
      $game_party.actors[0].add_state(30)
    end
      if $game_party.actors[0].weapon_id == 6
      $game_party.actors[0].add_state(30)
    end
      if $game_party.actors[0].weapon_id == 7
      $game_party.actors[0].add_state(30)
    end
      if $game_party.actors[0].weapon_id == 8
      $game_party.actors[0].add_state(30)
    end
      if $game_party.actors[0].weapon_id == 9
      $game_party.actors[0].add_state(30)
    end
      # Below is for knife
      if $game_party.actors[0].weapon_id == 11
      $game_party.actors[0].add_state(31)
    end
      if $game_party.actors[0].weapon_id == 12
      $game_party.actors[0].add_state(31)
    end
      if $game_party.actors[0].weapon_id == 13
      $game_party.actors[0].add_state(31)
    end
      if $game_party.actors[0].weapon_id == 14
      $game_party.actors[0].add_state(31)
    end
      if $game_party.actors[0].weapon_id == 15
      $game_party.actors[0].add_state(31)
    end
      if $game_party.actors[0].weapon_id == 16
      $game_party.actors[0].add_state(31)
    end
      if $game_party.actors[0].weapon_id == 17
      $game_party.actors[0].add_state(31)
    end
      if $game_party.actors[0].weapon_id == 18
      $game_party.actors[0].add_state(31)
    end
      if $game_party.actors[0].weapon_id == 19
      $game_party.actors[0].add_state(31)
    end
      # Below is for club
      if $game_party.actors[0].weapon_id == 21
      $game_party.actors[0].add_state(32)
    end
      if $game_party.actors[0].weapon_id == 22
      $game_party.actors[0].add_state(32)
    end
      if $game_party.actors[0].weapon_id == 23
      $game_party.actors[0].add_state(32)
    end
      if $game_party.actors[0].weapon_id == 24
      $game_party.actors[0].add_state(32)
    end
      if $game_party.actors[0].weapon_id == 25
      $game_party.actors[0].add_state(32)
    end
      if $game_party.actors[0].weapon_id == 26
      $game_party.actors[0].add_state(32)
    end
      if $game_party.actors[0].weapon_id == 27
      $game_party.actors[0].add_state(32)
    end
      if $game_party.actors[0].weapon_id == 28
      $game_party.actors[0].add_state(32)
    end
      if $game_party.actors[0].weapon_id == 29
      $game_party.actors[0].add_state(32)
    end
      # Below is for Creator
      if $game_party.actors[0].weapon_id == 31
      $game_party.actors[0].add_state(33)
    end
      # Activate right window
      @right_window.active = true
      @item_window.active = false
      @item_window.index = -1
      # Remake right window and item window contents
      @right_window.refresh
      @item_window.refresh
      return
    end
  end
end


When I enter my game now, I can equip any weapon and become afflicted with whatever I want. I control what the status effect does from a common event.

My problem is that I originally wanted this script in its own window above MAIN, so that it can be called upon from Scene_Equip instead of a huge amount of crappy code tagged in there lol. I have no clue how to go about that as I am a complete newb to scripting. Making even what I have was a miracle enough. If anyone can write it better that would be much appreciated and perhaps find a way for me to call upon it from within Scene_Equip so that it can run from its own script page.

Side note : There is only one character in the game. So I never needed to add multiple character IDs. That is why it only applies to if $game_party.actors[0]

Thanks for looking into my newb script troubles.
2
Troubleshooting / Help / Menu Is Closing *SOLVED*
December 02, 2013, 03:13:38 pm
.

When I go into my inventory and use an item, it uses it but automatically closes my inventory. How do I change this so that the inventory remains open until I decide to cancel out?

Quote from: gameus on May 06, 2013, 09:33:23 pm
Go into Scene_Item, line 71. Change this:
$scene = Scene_Menu.new(0)

to this
$scene = Scene_Map.new


Then to open the item menu through your events, use a Script Call:
$scene = Scene_Item.new


I am currently using the above method to call my inventory. Not sure if it is causing the issue or not but figured I would let you all know in case it is. Thanks.

.
3
*UPDATED* DEC 01 13

If my tutorial sounds as if I am rambling, I apologize. I tend to have difficulty explaining things so bear with it.

Introduction

Hello and welcome! I will be explaining how to create some decent icons so you can enjoy creating your own instead of ripping them off sprite sheets via google image.  :naughty:

Paint Programs

Firstly, I use regular old Windows XP Paint. You can find many programs to get the job done however. Every new program though will contain different tools and features. The learning curve for different programs can take a lot of time so I highly suggest you stick to 1 program and potentially use a secondary one for just a few features it contains that your primary program does not have.

Where to Begin

This is a tutorial on how to create decent icons, not how to familiarize yourself with your program, so moving on. Open up the program and create a 256X512 white square (Paint Shortcut should be CTRL+E). These are the dimensions for a standard tilesheet used in RMXP. This will make uploading easier. You will be creating a checker board design now. I use 2 colors to separate the board apart, green and pink.

Here is the image you should be going for. You can also just copy/download this image if you don't feel like creating it yourself. Just remember that every square needs to be 32X32. (Shortcuts for copy/paste are CTRL+C and CTRL+V)

Spoiler: ShowHide


3D and Shading

Before we begin designing icons, there are a few things you will need to master. They are creating 3D as opposed to 2D and creating dimension using shading. I cannot stress enough how important these are. They will make a gigantic difference in crappy icons as compared to beautiful icons. Another thing to remember and that will save tons of time, is to go ahead and create a palette. Think of the icon you will be creating and all of the colors that will be used. Then set up your palette with each of the colors and create anywhere from 2-5 different shades of that same color, each being anywhere from 10-30 LUM apart (10-30 is really just all a matter of preference). Example of a color separated by 20 LUM on a palette below.

Spoiler: ShowHide


I will show you below the difference between 2D/3D and no shading compared to shading. So here is an image of a box with each of the previously stated represented.

Spoiler: ShowHide


Not very impressive, no. But it shows the difference between a single sided object (Left), an object revealing 2 sides (Mid), and an object showing 3 sides (Right). Also, it shows no shading (Top), and a single extra shade of brown added in (Bottom).

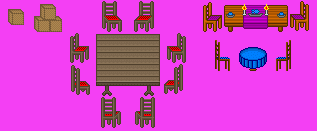
Here is one more picture demonstrating 3D iconing.

Spoiler: ShowHide


The chairs are turned different directions as you can see. The box was created and then copied and pasted 3 times to create a stack of boxes. You may also notice the big table is all the same size plank whereas the table on the top right has smaller sized width on the planks as it gets further away. This gives dimension.

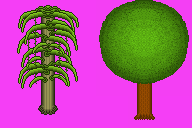
A more complex icon would be 2 tree's I created a long time ago. You can see really see the different shades (Shades used to give it dimension and create the illusion it is 3D) below.

Spoiler: ShowHide


The lighting on the first tree; on the giant branch like leafs sticking out of it, has a lighter green shade on top and a darker green on the bottom. This gives the illusion that it is curved or as if the sun is directly above the object. The tree bark has lines of light brown giving the illusion that it has dimension rather than being flat. The other tree on the right is brighter in the center of its top and goes darker as you get further out. That makes it appear as if it is curved. Also, ALL of the colors used are the same. Meaning, the tree on the right, its top is all the same green, just different shades of the exact same green. Same with the trunk, all 1 brown, just different LUM. In reality the tree is only 2 colors, just tons of shades of the 2 different colors.

Step Process

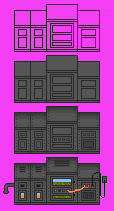
Below is an image of the process I use to create an icon. First start with the border. You should use your darkest LUMed shade you have made for it. Then take the brightest and fill it in. Next add the shading. Then you can finish with the details. There were only 4 shades of grey used. I think when I made the icon they were all only 10 LUM apart (Made this icon a long time ago).

Spoiler: ShowHide


Tips

Always think of what you are going to create first. Picture every color needed for your palette. Start by creating the outline of the object first. Try creating a bold outline so the image pops. Imagine a light bulb or the sun hitting the object from any angle you wish and keep it there as you shade the icon. Generally the further away something is, the smaller and darker it will appear. Separating your palette colors with only increments of 10 LUM will make the icon look like a painting whereas separating them by 30 or even 40 LUM will make the image really pop and appear cartoonish. Good luck.

Glad to help anyone out or answer questions. Hope someone makes use of this tutorial and it encourages people to create their own icons! Once you become experienced and familiar with iconing, I highly suggest you take only 5-10 minutes per icon, then throw it into the game and continue with the next icon. If you spend hours on every icon, you will kill yourself. Trust me. You can ALWAYS come back later and fix up your icons. Just create workable icons and when you get a little free time you can perfect them. The two tree's above, the one on the left took about 30 minutes (Odd looking tree, tried being creative) and the one of the right only took about 5 minutes. So use your iconing time wisely and have fun!  :evil:
4
General Discussion / What steps do you take?
May 11, 2013, 11:41:18 am
Hey everyone! I was curious as to what steps, or maybe I should say 'process', you take in order to achieve game completion towards whatever game project you are working on.

I myself usually start by plotting out the basic storyline of the game and figuring out how the storyline will begin and eventually end. Then amassing all of the tile-sheets/icons needed and possibly even some tunes. After mapping I move on to plugging events/scripts. Then finish by making sure everything is tested and perfected. Usually I run into issues since I love to continually add features into my game or even side type stuff such as side quests or farming/mining and all this bull until I am so distracted from the game itself that it turns into something I don't even like anymore...  :^_^': Usually my game never reaches a finishing state and I always get stuck on creating icons/character/tilesheets since I love to make that sort of stuff from scratch.

Just curious as to how other people do it.
5
Resource Database / Midi's For Use
May 08, 2013, 02:59:46 am
I made some midi's months ago for a couple games of mine and feel like sharing some of them for free use. No need to credit me in your game if you don't want to, but do not claim to of made them yourself in your own game. I believe these links will expire in 1 week. If that happens I will find another website to restore them permanently. I also ask that nobody redistribute these online.


They are all made to be set as map background music as they are all made to loop/repeat constantly. They can also be converted to MP3 or any other music format using the right software. Just plug and play.

If you want me to make you custom midi's for your game, just hit me up.
6
I was looking through the various menu/inventory scripts on here and noticed that all of them either have nothing I am looking for or exactly what I am looking for but with tons of extra things added that I can't seem to get rid of. I tried eventing my own menu and it works, but the annoying process of eventing variables so the game can keep track of items and how many of each item you have is excruciating. So I need a script...

What I am looking for...
I am looking for a script for RMXP that is very basic and simple. I have the menu disabled in my game and I use my own custom menu through eventing but I need a scripted "Item" menu. Just the simple touch of a key on the keyboard brings up your items only, not stats or equipment or any of that BS. Just a simple item menu script that keeps track of items you pick up and how many of each you have ranging from 0 to 99. I do not need a discard, description, or any of that for the items. Just a simple menu where the player can go through their items to see what they got. Idk if this info helps but the description, use, or discard I have set through common event via pressing C "Enter" on an item. So no need to add that stuff.

I use RMXP and the only script I have in my game is one that automatically makes your game go full screen when you start it so I don't think there will be issues with your script counteracting with my game in a negative way. Not sure how scripting works but just let me know if you are someone who can make this happen! =P

Oh and I was also thinking that maybe a script that ONLY calls your items (The pre-set item menu RMXP comes with) and closes without backing to the main menu, that may be a workout and exactly what I am looking for. Idk if that is possible though considering I have the menu disabled but if it is possible that would be amazing. THANKS!
7
Recruitment / [RMXP] Brand New Game? Help needed.
March 22, 2013, 11:05:24 am
I am looking to recruit some people in creating a new game. I have little to no experience with scripts other then how to put a script into the script database. I much prefer creating graphics and eventing things.

I am not sure what type of game it would be and would like to discuss it with whoever joins me. Working together would produce a game much faster. I was thinking maybe a harvest moon based game or even a deserted island survival game. I wouldn't mind creating an RPG ABS but one thing I can't stand with the RPG's people create now is the typical damsel in distress rescue me or go to this town to this dungeon style RPGs.

But whatever the case, if you would like to create a fun game with me, PM me or reply to this topic. I have icons/screenshots of my pixel work I could show you also. I am open to many idea's, just need people who are down to produce something, Thanks.
8
New Projects / Topic Closed
September 07, 2012, 06:31:41 am
Topic Closed
9
Event Systems / Day/Night Cycle
May 29, 2012, 04:37:08 am
First and foremost this is a parallel process. It does not keep track of days, it just gives the game a dawn, day, dusk, and night.

This system will give you a 14 minute day/night within your game. Changing the time to more or less than 14 minutes is easy to do and I will explain that as well. Dawn is 3 minutes, Day is 5, Dusk 3, Night 5. Which = 14 Minutes.

The Common Event needed,
Spoiler: ShowHide

: Branch End
@>


Understanding the Common Event,
Spoiler: ShowHide
The "Wait 20" equals 1 second.
There are only 2 variables used that can be named to whatever you want. One is used for keeping track of seconds and the other keeps track of minutes. The wait will continually increase the "Variable Day/Night Seconds" by 1 until it hits 60, then it will increase the "Variable Day/Night Minutes" by 1 and reset the seconds so it can start the process over. When "Variable Day/Night Minutes" reaches 14 which is approximately 14 minutes, it resets the minutes so everything can start over and it would then be morning.
A picture is displayed for dawn, day, dusk, and night as the "Change Screen Color Tone" is used to dim the screen out or brighten it so it appears that the sun is rising and falling towards night time.
You will need to set a "Condition Switch" to turn this common event on, so just stick it at the beginning of your game or whenever you would like to turn it on/off to control whether the cycle of the sun plays a factor.
You need pictures to display. I will add in free ones below.
To change the times at which the 4 times of day appear, just edit the Conditional Branch Variable of the Minute (Of dawn, day, dusk and night) and change it to whatever you wish.


Uses for this Common Event,
Spoiler: ShowHide
- Particular times of the day based quests
- Particular times of the day based skills such as farming
- Particular times of the day based enemies such as enemies that only appear at night
- etc.... you get the idea

There are multiple ways you could improve on this. I am lazy right now so I won't add anything to it. But idea's are adding in not only day/night cycle but keeping track of days/months/years.


The pictures needed,

Spoiler: ShowHide


Just copy and save them on your PC. Then go into your Material Base and upload them as Pictures.


If you feel that I failed to mention anything than ask. I didn't really give a detailed description on understanding or how to add this into your game, so if you are new to the program, ask me and i'll answer. The reason you need a switch for this by the way is in case you enter a building and hate that the lights are still out at night time. This isn't apart of the idea in my game though so I didn't add that. But yeah... Thanks and bye.
10
General Discussion / Eventing an ABS (Discussion)
May 28, 2012, 12:34:13 am
First off, I think this belongs in this forum since this is only a discussion.

Secondly, I have been addicted to eventing an ABS ever since I found so many crappy scripts on it. I did extensive searching for the perfect script and most of them are either to complicated, lack my specifications, or require a lot of editing or changing things. I know there are simple ones out there, but I said screw it and became obsessed with eventing one.

I am making this topic because I am curious if anybody has ever 'evented' an abs. I have become so addicted actually that I have decided to use absolutely NO scripts for my game. I will list everything that I have done so far in my common events without using any sort of script. I will keep the names of everything the same way that I have it listed in my common events.

~ Main Character's Attack (Self explanatory)
~ Hp Meter (Main Chars hp/health meter, also governs game overs)
~ Sound Effect Volume (For enemies/main character/also governs enemy attacks)
~ Character Distance Attack (Bow and arrows/long range weapons)
~ Menu (Displays the menu/items)
~ Menu Call Database (Gives commands to the menu)
~ Enemy Pursuit (Allows enemies to stop chasing when you get a certain distance away)
~ Day/Night Cycle (Self explanatory)
~ Playlist (Lets you play your playlist of midi songs)
~ Walkman (Keeps track of midi's and lets you organize a playlist)
~ Save (Self explanatory)

The enemies in my game are set to auto chase when you get within a certain distance. Once they engage (multiple enemies can engage you or swarm you) they will begin attacking once they get on any surrounding square of the main character (as of right now). You attack as normal (I will be adding a fury meter and a special attack instead of magic in my game) and your attacks run separate of the enemies which allows me to give your weapons and even every enemy in the games attacks, a separate delay. Enemy HP runs off a variable and whichever enemy your attacking simply gives you its variable so the game knows which enemy your are putting damage towards. You may think it is a lot of variables but it isn't, only 30 variables will be used and shared between about 2,500 (estimation) enemies in my game. Since there will never be more than 30 enemies on one screen (for parallel process/lag reasons). Distance weapons use your x/y and the enemies x/y to allow for distance attacks. Throwing in animations brings it to life as you will see arrows flying across the screen. All weapons in my game use the standard system of "The better the sword the more dmg it does" thing, but I have added in certain swords that do more damage towards certain species of enemy.

But yeah, this is pretty much what I have so far. I would love to hear feedback or what others have created with events. If you have used scripts than spare me the details. I have much much more detail of everything and I would love to upload some sort of short video on my battle system so that everybody will see that it is possible to event a fully working, bugless, ABS through only events. This topic is mainly about discussing eventing ABS but if you wish to speak of other things you have evented without a script, than please do so. Just make sure it is something elaborate, I don't care about eventing a store or farm system or some other easy task. If it is something funny or worth talking about then mention it. I am a nice guy by the way.

P.S. I made a 'hookshot' event system based off The Legend of Zelda and it is incredibly hilarious to see if you haven't done it yourself. If anyone needs help eventing anything or creating icons, let me know.

11
Welcome! / Seltzer, hello community.
April 11, 2012, 08:42:24 am
I have been visiting this website for over a month now. I finally decided to make an account. How is everybody?

I have RPG Maker XP and learned incredibly fast how to operate it since I use to code and icon on BYOND. When I find adequate time, i'll be sure to contribute my creations to the website.