Changing Tileset Colors Using Multiply Function
This tutorial will show you how to make a layer that allows you to change the colors for a map quickly. I've seen the color replacement tool for this, but it doesn't allow the use of as many colors, nor the ability to change your caves with the paint bucket tool when you're done.
Programs needed: Just a paint program. I use adobe photoshop elements. You don't need a super fancy paint program, just something with layers and layer option such as 'multiply' or 'color' and 'opacity'.
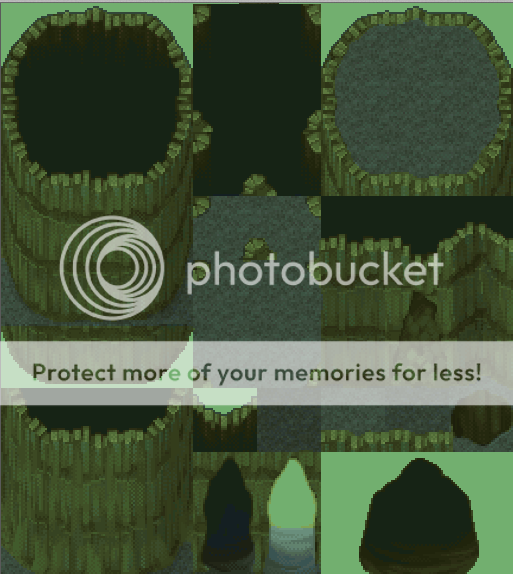
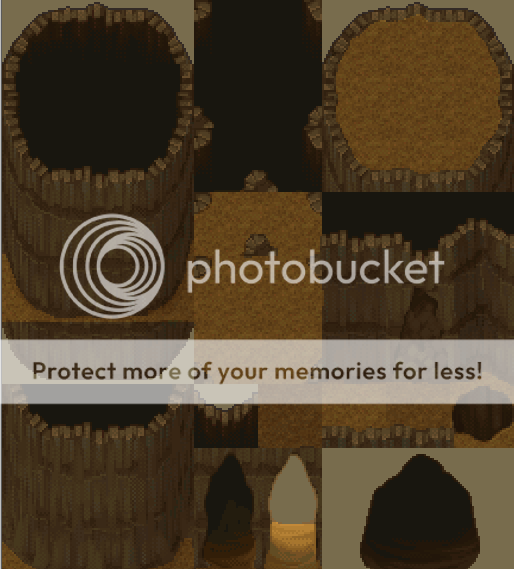
1) Open up the map you want to alter. Since most RPG's have seemingly hundreds of cave maps, I will be working with a section of the earth cave tile set.
2) Change the Earth cave layer to multiply and place a new layer under it that is set to normal.
Note: This will allow the colors on the second layer to bleed through onto the cave map without actually changing the pixels.
3) Select a color that you can see easily. Use the paint bucket tool to change the entire layer to that color.
4) Next, carefully color in the walls or floor (whichever seems less dull to you) of the cave using a different color. Personally I like to go for something super high contrast here so I know where I'm at.
5) If you ignored the above note and pixels are out of the lines, clean it up. After it looks pretty decent grab the pain bucket tool and select a color that seems totally awesome. For me, I went with a scarily intense blue.
Note: Make sure your paint bucket tool is set so it's NOT contiguous and then set a tolerance of 1. This will allow you to change the entire color set on your layer without having to click all over the place.
6) Now change the color of the floor using the paint tool.
7) Select the layer that has the lovely paint work you just did and lower the opacity to whatever looks nice. I went with a value of about 67% and got this:
.gif "Cool") Admire your lovely cave that is not RTP brown and rejoice.
Admire your lovely cave that is not RTP brown and rejoice.
9) This rejoicing will be short-lived once you put this in your game and map with it, because you will notice if you did not do a good job cleaning up. If this happens, it will most likely be an issue with the cave walls not lining up quite right; just cry for a minute on the inside, then go back into paint and fix it. This happened to me about 12 times, but now it's perfect and I never need to touch the thing again. Yay!
10) Purple and weird grey not your thing? It's okay! Now that you have made a lovely paint layer you can change it with two clicks of your mouse and a paint bucket tool.
Additional Notes: A very similar effect can be achieved using your cave layer and then a new layer placed above it. Make sure the cave layer is set to normal and set the new layer to 'Color'. This method gives very similar results to the multiply effect, but is easier to use if you are trying to be VERY precise with your color set. If your paint program has one function and not the other, this is for you.
Also, don't worry about the colored haze over everything that's not supposed to be colored. When you import it just click it and set to transparent like you usually would. If you need it to be white for whatever reason, have fun erasing.
This tutorial will show you how to make a layer that allows you to change the colors for a map quickly. I've seen the color replacement tool for this, but it doesn't allow the use of as many colors, nor the ability to change your caves with the paint bucket tool when you're done.
Programs needed: Just a paint program. I use adobe photoshop elements. You don't need a super fancy paint program, just something with layers and layer option such as 'multiply' or 'color' and 'opacity'.
1) Open up the map you want to alter. Since most RPG's have seemingly hundreds of cave maps, I will be working with a section of the earth cave tile set.
2) Change the Earth cave layer to multiply and place a new layer under it that is set to normal.
Note: This will allow the colors on the second layer to bleed through onto the cave map without actually changing the pixels.
3) Select a color that you can see easily. Use the paint bucket tool to change the entire layer to that color.
4) Next, carefully color in the walls or floor (whichever seems less dull to you) of the cave using a different color. Personally I like to go for something super high contrast here so I know where I'm at.

5) If you ignored the above note and pixels are out of the lines, clean it up. After it looks pretty decent grab the pain bucket tool and select a color that seems totally awesome. For me, I went with a scarily intense blue.

Note: Make sure your paint bucket tool is set so it's NOT contiguous and then set a tolerance of 1. This will allow you to change the entire color set on your layer without having to click all over the place.
6) Now change the color of the floor using the paint tool.

7) Select the layer that has the lovely paint work you just did and lower the opacity to whatever looks nice. I went with a value of about 67% and got this:
 Admire your lovely cave that is not RTP brown and rejoice.
9) This rejoicing will be short-lived once you put this in your game and map with it, because you will notice if you did not do a good job cleaning up. If this happens, it will most likely be an issue with the cave walls not lining up quite right; just cry for a minute on the inside, then go back into paint and fix it. This happened to me about 12 times, but now it's perfect and I never need to touch the thing again. Yay!
10) Purple and weird grey not your thing? It's okay! Now that you have made a lovely paint layer you can change it with two clicks of your mouse and a paint bucket tool.
Additional Notes: A very similar effect can be achieved using your cave layer and then a new layer placed above it. Make sure the cave layer is set to normal and set the new layer to 'Color'. This method gives very similar results to the multiply effect, but is easier to use if you are trying to be VERY precise with your color set. If your paint program has one function and not the other, this is for you.
Also, don't worry about the colored haze over everything that's not supposed to be colored. When you import it just click it and set to transparent like you usually would. If you need it to be white for whatever reason, have fun erasing.


